Blog
How To Find Lift Supports By Size
Are you looking for lift support struts or replacements for the old lift support hardware? No matter finding lift supports by size or by application
![How To Build A Wooden Concealed American Flag[DIY]](https://apexstone.co/wp-content/uploads/2023/08/How-To-Build-A-Wooden-Concealed-American-FlagDIY-1024x541.jpg)
Table of Contents:
1. Material Preparation ( Material List attached)
2. Cutting and Processing the Wood Blocks
3. Staining: Selection of Pigments and Precautions
4. Carving Stars
5. Assembling the Processed Wood Blocks
6. Installing the Back Panel of the Box
7. Attaching Cabinet Doors to the Cabinet Body
8. Make a groove and help to open the lid
9. Processing the backboard
10. Sealing the flag
11. Installing the hardware
12. Installing the gas struts
13. Filling the box
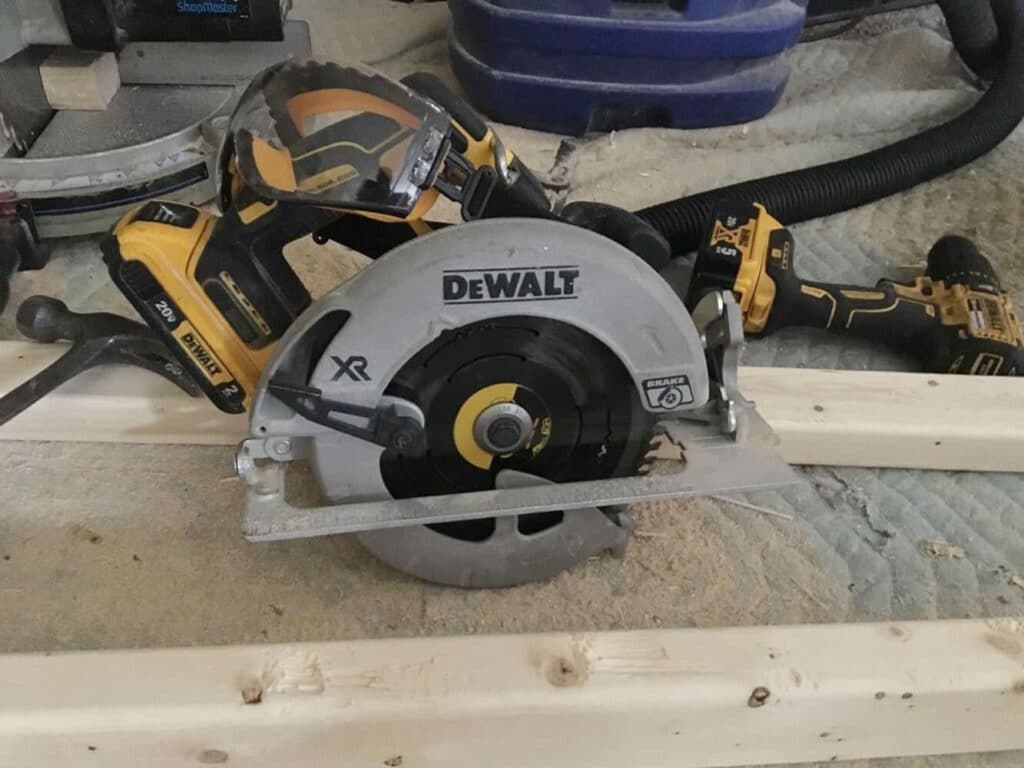
Head to the local hardware store and we need to get some wood, as for Online shopping? There are limited choices and fragile deliveries. Don’t ask, just trust me. With the wood we get, we can start cutting with the Circular Saw.
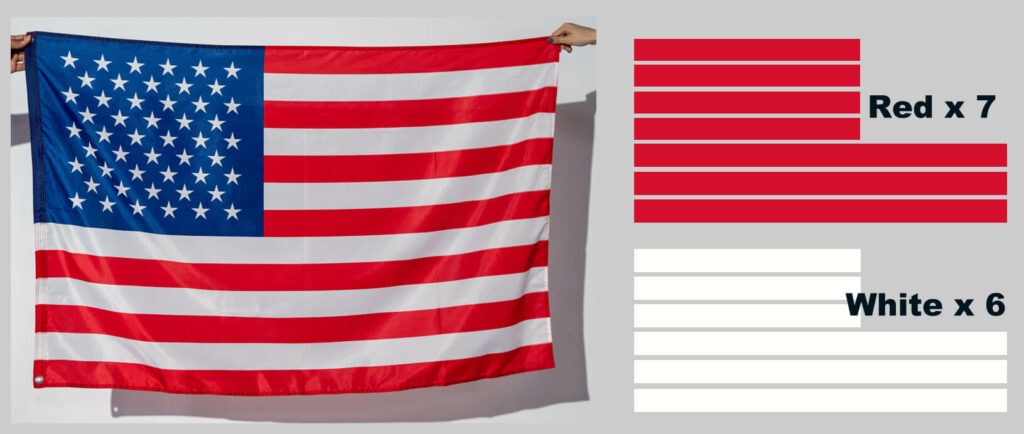
The American flag has seven red stripes and six white stripes, so we should cut the wood into 13 pieces we need. Need 7 pieces at 22 1/4in, and 6 pieces at 37 inches.
Next, we need to cut the union, also known as the canton by some people. The size should be 14 3/4in x 10 1/2in.
Before cutting, mark all the necessary areas with a ruler or level to create straight lines. Remember to double-check your measurements to ensure you’re cutting the correct amount. Once we’ve marked it down, just start cutting. But don’t forget to wear eye protection, safety comes first.
Now, it’s time to do some wood burning! Use blow torch throughout wood areas. This technique not only protects the wood from insects and weather but also adds a nice little detail to our woodwork. I use a blowtorch that I got from the local store, you can shop around to find the best price. Sometimes, you can get a better deal at Home Depot or Lowes.
Remember, we don’t want to accidentally set it on fire, so just make several passes over the wood with the blowtorch. Also, be sure to burn the ends and sides as we get ready to stain, this ensures that you are staining the right pieces.
I’m using a semi-transparent navy-colored stain for the Union field. I found an old rag and used that to apply the stain on the wood. Apply one or two coats of stain for best results.

If applying a second coat, allow the first coat to dry completely. Be sure to cover the edges and corners thoroughly. One nice coat should do the trick. We don’t need to stain the back since it will be spray-painted or burned to black, we can stick with the semi-transparent stain. For the seven pieces of one by two, we’ll go with a barn red stain. As for the six pieces of wood, we’ll use a white wood stain on them.
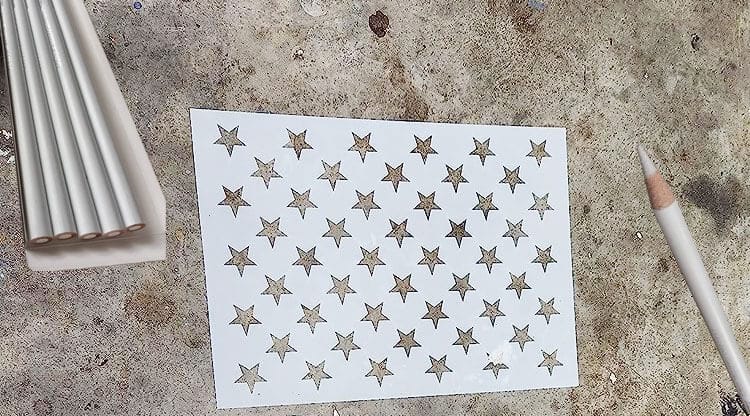
In this section, we will first prepare a 14.8″L x 10.5″W 50 Star Stencil. Tape the stencil down, all 50 stars with a white charcoal pencil.
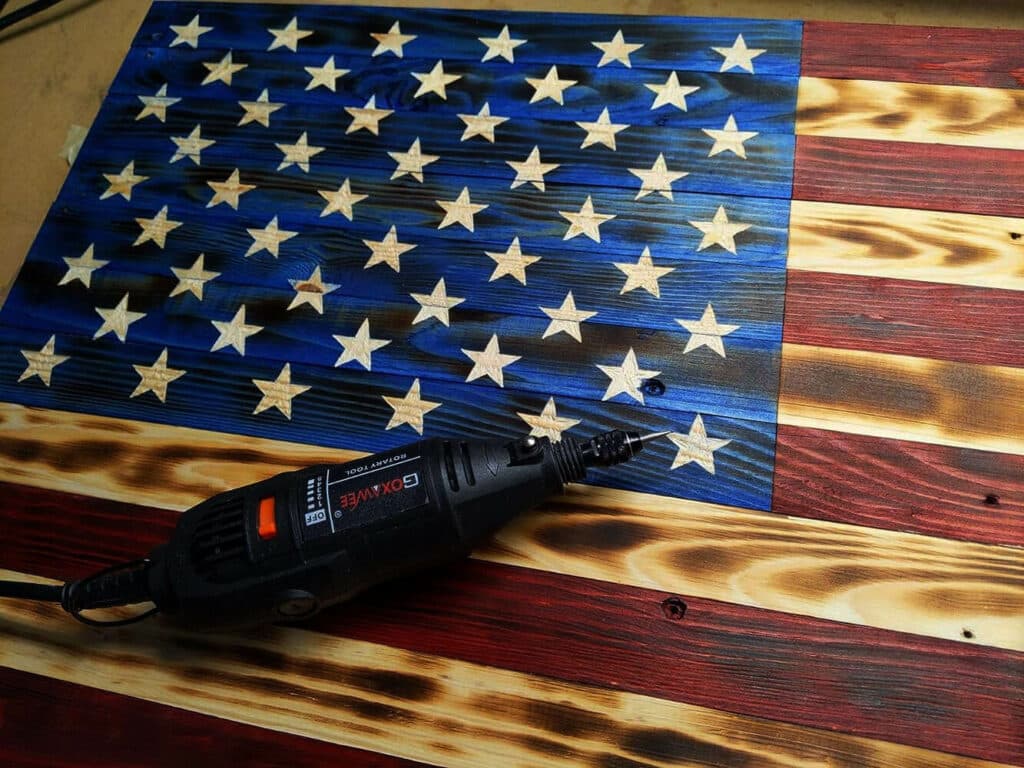
In this step, we’ll keep it super easy by using our Dremel tool, using both 105 and 106 bits throughout the process. Just choose the one that works best for you. Personally, I used 105 for most of it, but you might prefer 106 or more. Carefully outline the star, making sure not to go outside the lines. Once the outline is done, switch to a bigger tip to carve out the inside.
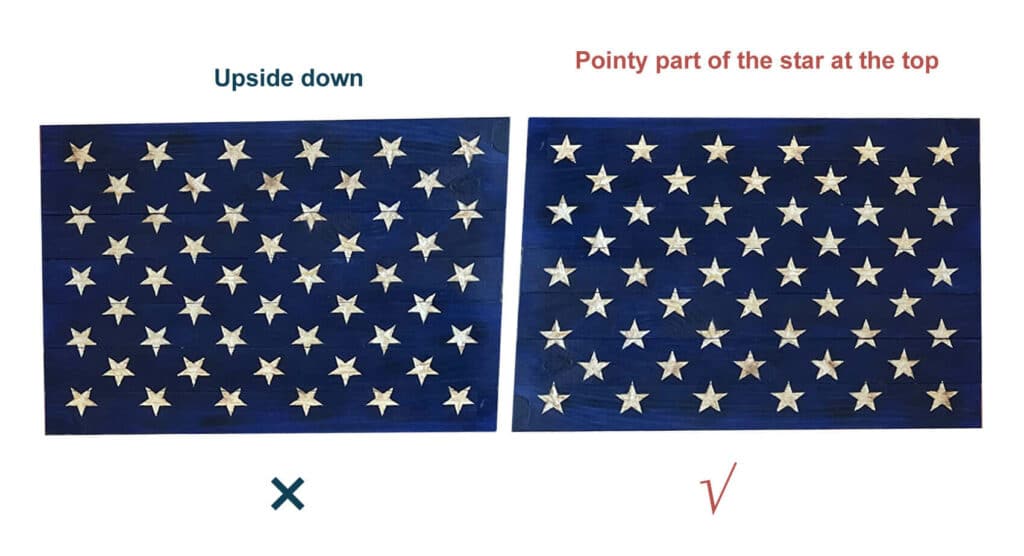
Remember, the union should not be upside down, it should have the pointy part of the star at the top.
Before we dive into gluing and nailing, let’s secure the flag in place using extra-long steel bar clamps, which you can easily find at the hardware store. Attach the clamps to the flag, this step is crucial for adding four support pieces to the back of the flag.
After preparing the clamps, we need to flip the flag over onto its face. Make sure you swap the union to the other side and double-check that the stars are facing the right way, as we mentioned above.
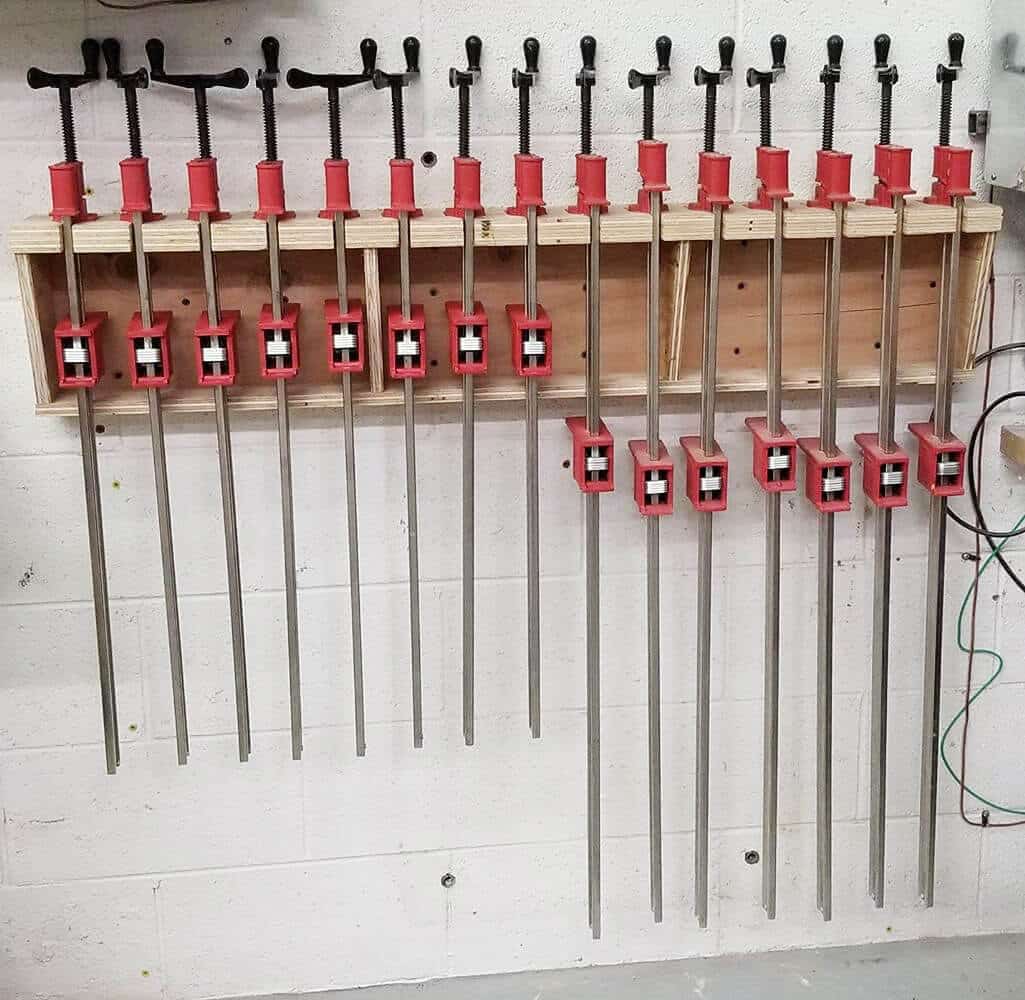
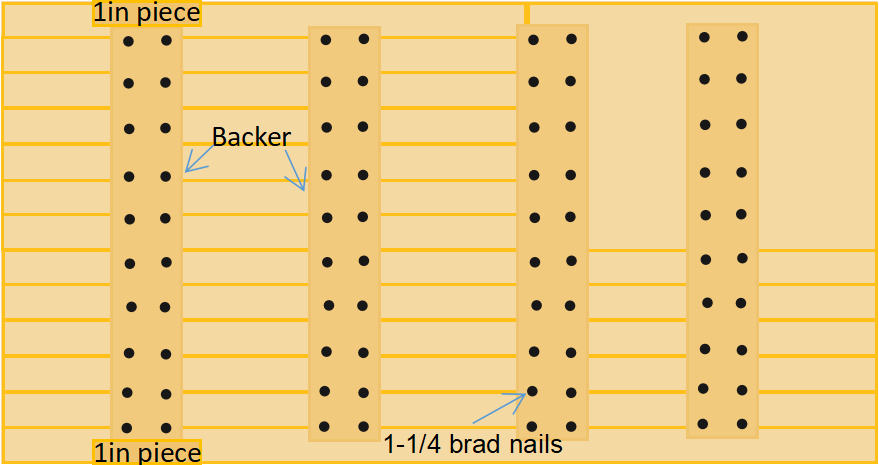
Now, we need to mark at 1 inch and 17-1/2 inches from either side, and these marks will indicate where I put my backers. I’ll place my backers (1in x 3in x 17-1/2in) on the insides of those lines, ensuring one ends up right halfway between these two marks. Make sure to measure it properly, allowing enough room for the box or cabinet to fit snugly on top of the flag. Then, we can start on the right side and clamp it in place, readjusting the clamps to ensure they are on either side of the wood pieces that I’m applying. This way, it will be nice and taut.
To do this, we need some 1-inch thick pieces of wood to measure the top and bottom of the back support. This is important because we don’t want to go too low or too high, as it could affect the fit of the box or cabinet that we will build to go on top of the flag.
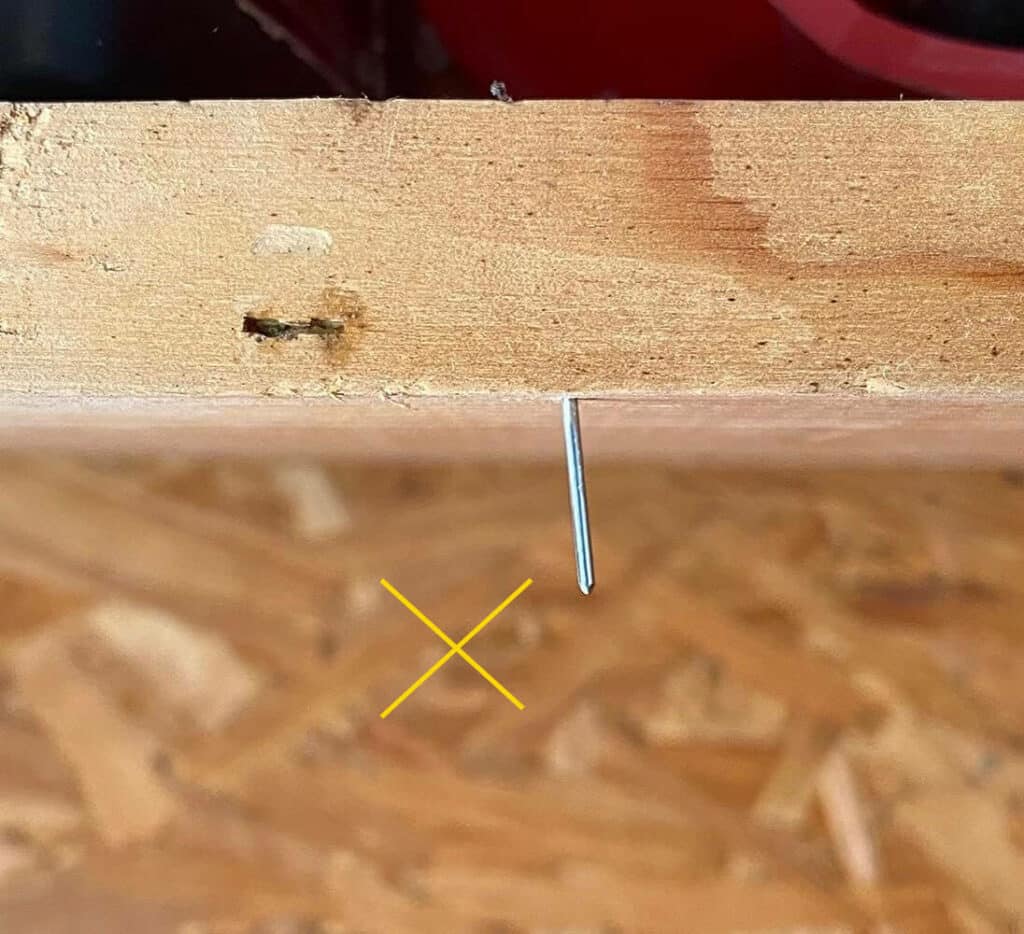
We choose the 1-1/4 brad nails, using anything bigger could pierce through the flag.
The 1 in-thick wood pieces are only used as guides, we won’t be nailing or gluing them. If the other four wood backers are ready to go, we can proceed to glue and nail them.
To attach the wood pieces securely, apply a small amount of wood glue on the back of each piece, this will give it some extra support once it dries. Place the wood piece on top, align it with your guide, and then begin nailing with your brad nailer. Once the first piece is done, move on to the next one. Remember to use the glue and guide for each piece and adjust the steel bar clamp for added support. Use your brad nailer to put two or three nails per wood piece. Adding a few extra nails will ensure it is extra secure.
The next step is to create the box, which we refer to as the cabinet. For this, we will need 1in x 4in wood. Cut two pieces of wood at 37 inches each and two other pieces at 17-1/2 inches in height.
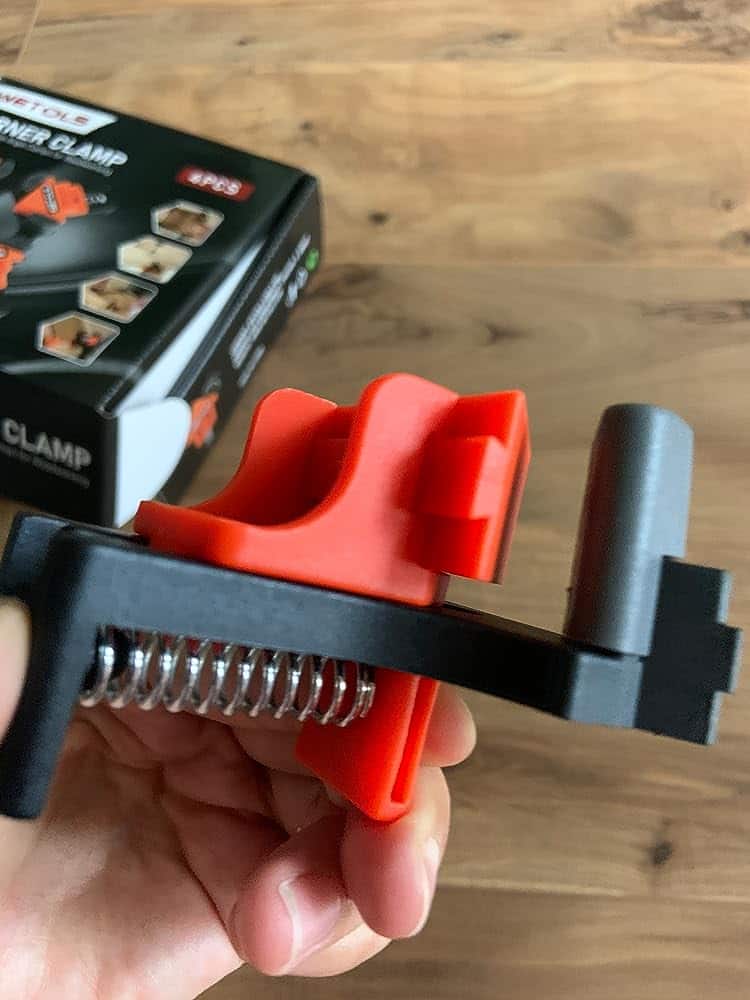
make sure to nail this box together on top of the flag. So you want to know that it fits perfectly. I used a 90-degree corner clamp for this box, which made the process super simple and easy. It ensured everything was square. To finish it off, I used inch and 1/4 brad nails.
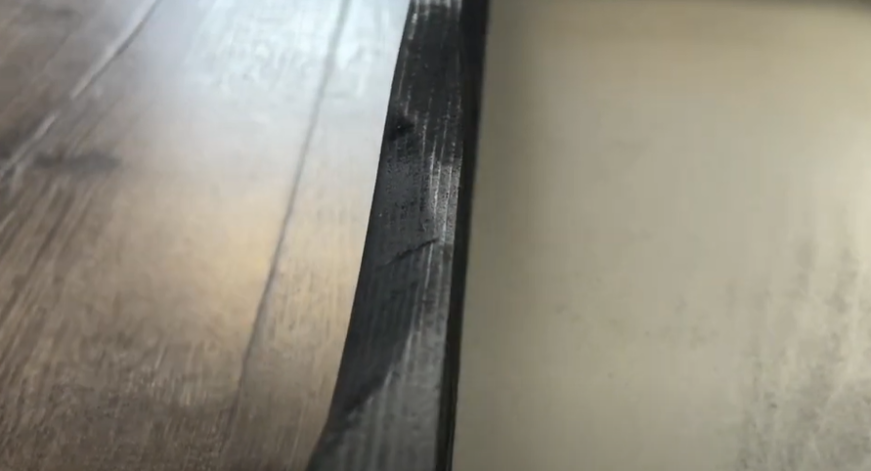
After we got that all put together, the next thing that we need to do is to make a groove in the bottom, this is an optional step, but I wanted the flag to be easily opened without any visible handle or indentation.
To do this, measure the center of the box and mark it first. Then, we are going to create a half-moon figure. For this process, a jigsaw is needed to cut the half-moon angle. Care must be taken to hold the wood steady during the cutting process. You can adjust the depth and width of the cut to your liking. After cutting, smooth out all the rough edges and splinters using 80-grit sandpaper.
Once the groove is completed, it will be situated underneath the lid, making it effortlessly accessible while remaining inconspicuous. After sanding and painting, the groove will become virtually invisible, as shown below, allowing for easy lid opening without being noticeable to the user.
For this, I am going to place the box on top of the plywood larger than 37″ x 19.5″, we should ensure that the edges are square to the plywood and ensuring you trace the outside and not the inside, as the plywood will cover the box. Once the tracing is complete, use a saw to cut the pieces into perfect rectangles.
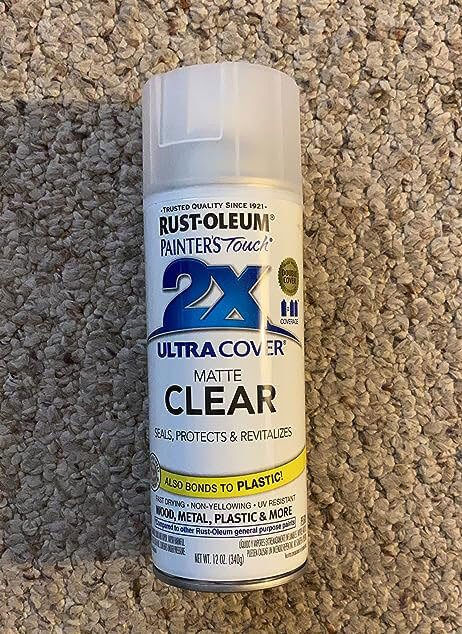
To seal the flag, I’ll use the Gloss Clear Ultra Cover Sealer, one good coat of this sealer will provide a nice finish.
For the box, you have the freedom to choose your preferred painting or staining method. Personally, I prefer to paint the border and the inside black, while using a metallic finish gray for the interior. You can also paint the back of the flag if desired. To ensure clean edges, it is suggested to tape off a line around the edge before painting. The process will involve painting the black first, then taping off the edges with frog tape before spraying the inside.
Once we finish painting, it’s time to install the hardware. We will use a long piano hinge, which is easy to install. The hinge is 1-1/2 x 30 inches and has a bright nickel finish. To make it less noticeable, we can spray paint it black. Next, we are going to use some small wooden shims (about 1/16in) to lift it up. This will create enough space for the hinge to move without rubbing against anything.
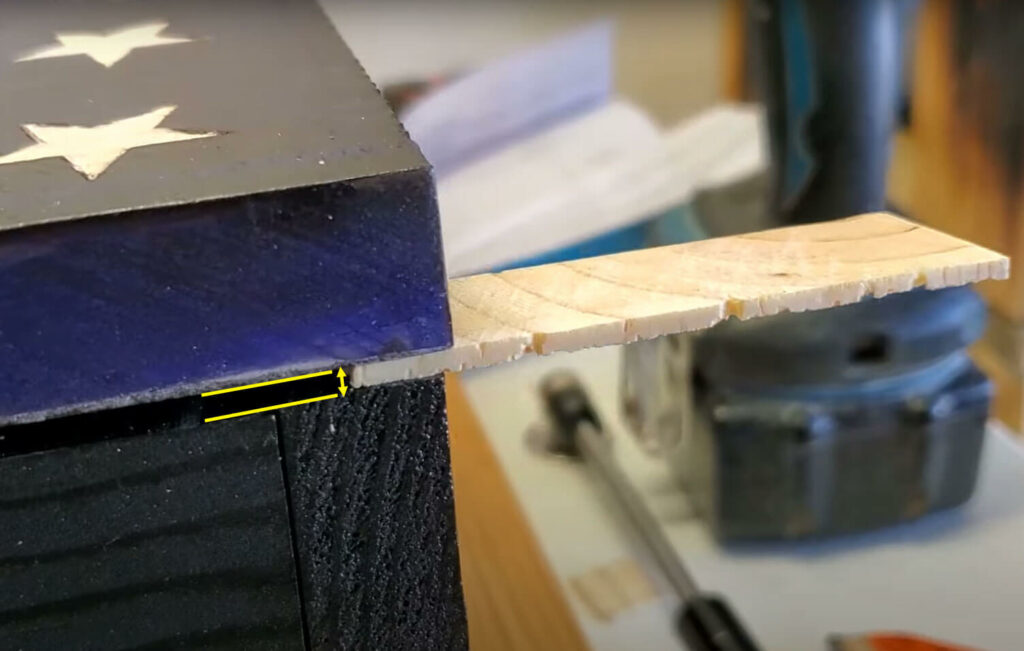
Alternatively, a piece of cupboard or similar material can be used, as long as it is equal on both sides. Align the hinge flush with the top and ensure the corners are lined up. Then, place the shims on both sides and center the hinge over the gap. Now, we need to pre-drill and screw the hinge all the way down, making sure it stays aligned throughout. If you prefer, you can opt for cabinet-style hinges that go on the inside for a more concealed look.
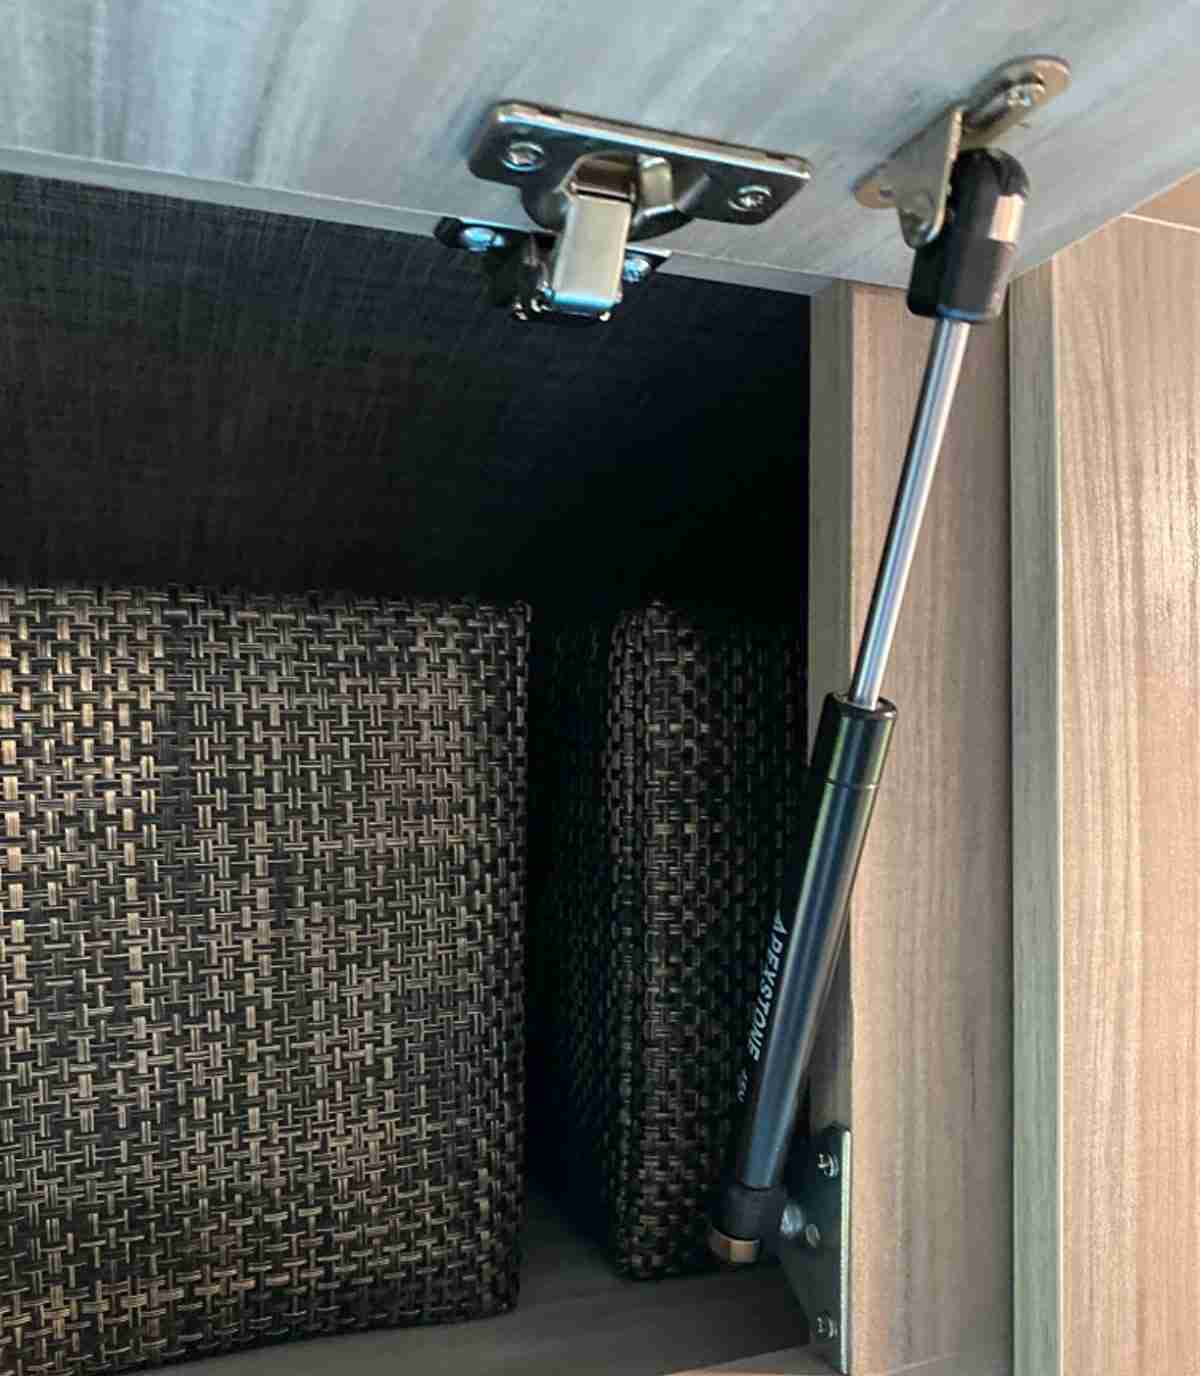
Now we are going to install the gas struts. Before installing the gas shocks, ensure that the door is in the desired position for when it is opened. This step is crucial to prevent misaligned and won’t close properly.
When selecting the appropriate spes of lift support for the gun case, we should take its dimensions into account. these two extended lengths are the most popular: 15 inches and 10 inches. In most situations, a force of 100N will be adequate since lids are typically not too heavy. However, for heavier flag lids, it is recommended to choose vertical installation over horizontal. You can refer to the images below: the left one illustrates horizontal installation, while the right one shows vertical installation.
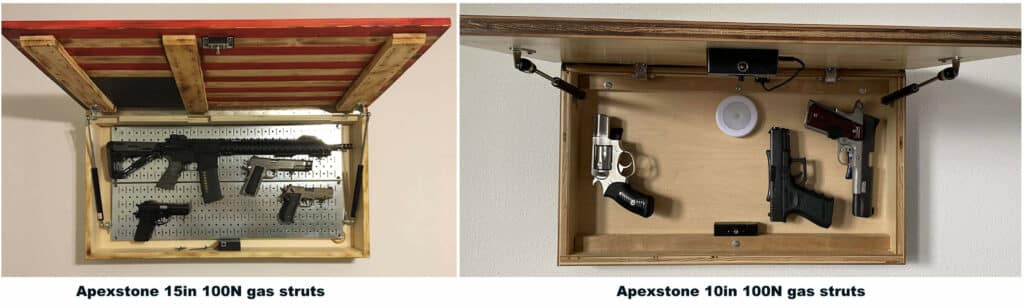
To determine the mounting position of the struts, let’s consider using 10″ 100N gas struts as an example. We usually measured about 2.8 inches from the bottom of the flag door upwards. This is where the top mounting bracket should be placed, and it marks the starting point for the strut. If your flag is of a different size, You can make slight adjustments to the measurements as needed to ensure the struts fit perfectly for your project, more or less than 2.8in will also work, it is recommended to be over 2.8in, because installing vertically will get more support than installing horizontally. Next, measure 8.9 inches down from the top of the box and 1 inch (at least) from the side inward, this is where the lower mounting point of the struts will be placed.
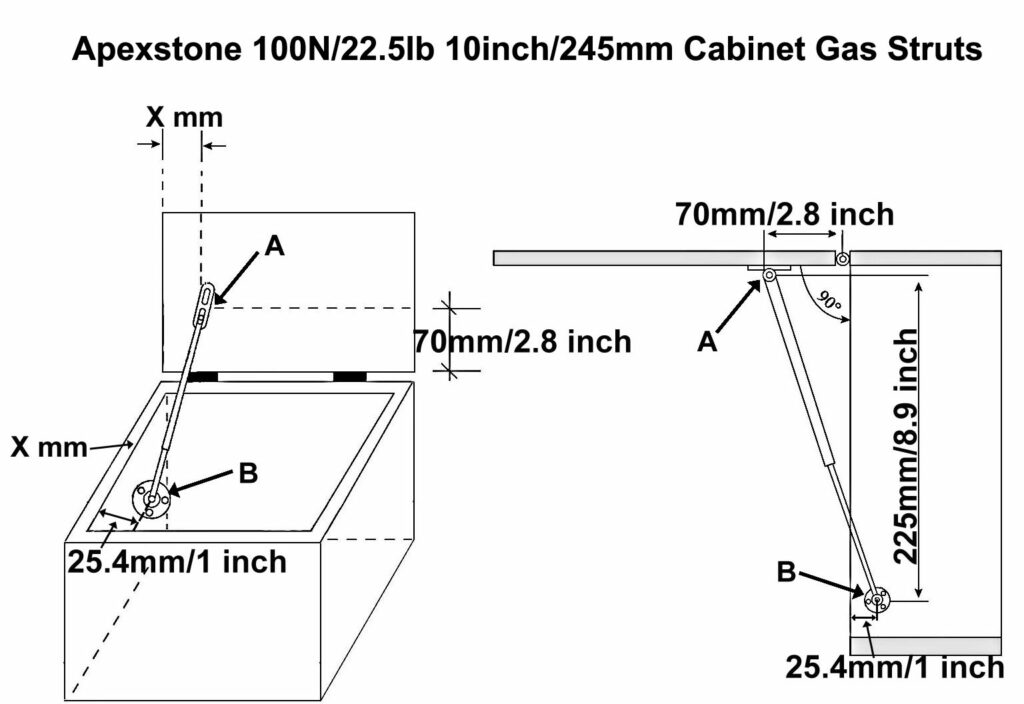
For 15″ 100N gas springs or other specs, just follow the instructions provided online for a smooth and straightforward installation process. If the lid is heavy, consider installing the struts vertically rather than horizontally. Keep in mind that different box sizes might require different measurements, so it’s essential to adapt accordingly. By following the instructions and making any necessary adjustments, you’ll achieve a well-fitted and functional gas strut installation.
For the second strut, you’ll need to mirror the same measurements you did on the other side. Once you’ve done that, secure the struts in place by using three screws on each end. This will complete the easy installation process.
Usually, we can purchase rifle brackets or pistol magnets from the local store. Alternatively, you can make gun hangers out of wood if you prefer a DIY approach. For simplicity, I recommend buying rifle and pistol holders for now. If you want to create divisions, you can add shelving to the box.
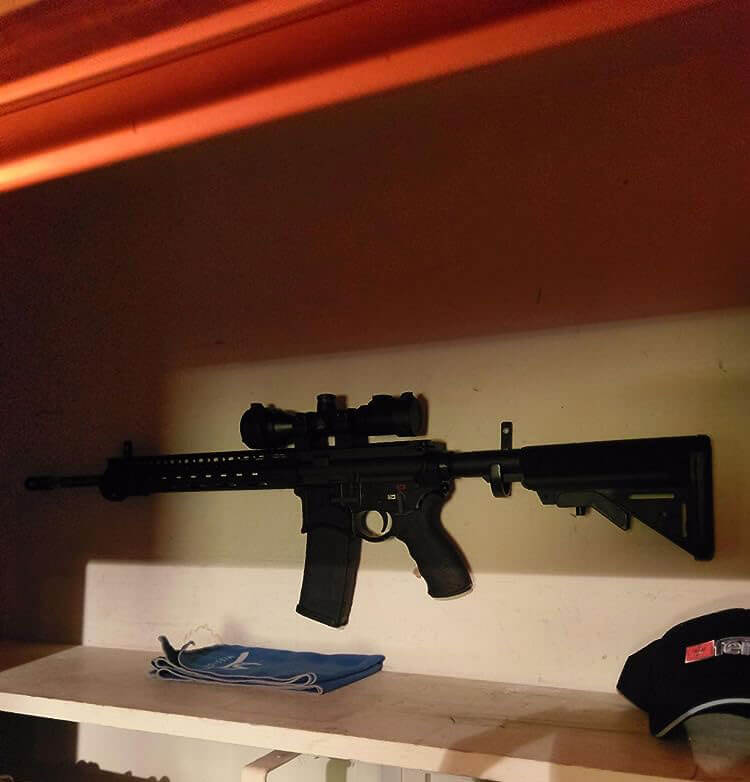
To ensure a secure attachment to the wall, it’s crucial to screw the box into the studs. This will prevent it from accidentally falling off, which could be dangerous depending on what you store inside. I suggest using at least five screws to make it sturdy.
If you’d like extra protection, you can also add foam cutouts inside the box to securely fit and protect your items. This way, everything will be nicely organized and protected.
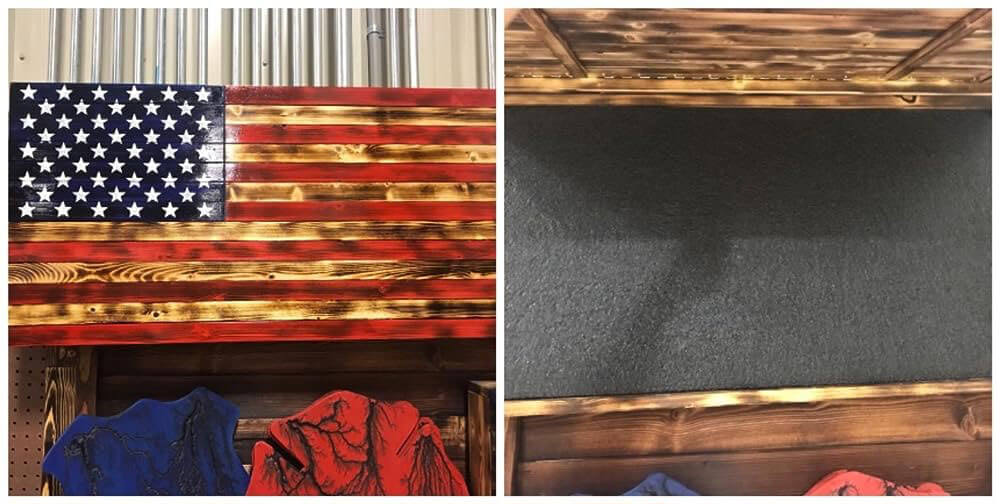
Here is the final American Flag Concealed Gun Cabinet. I hope you enjoy it.
Are you looking for lift support struts or replacements for the old lift support hardware? No matter finding lift supports by size or by application
Are you planning to replace the gas struts on your truck toolbox, either by upgrading the toolbox or replacing worn-out struts? Whether you’re getting it